
It is so important to carry out diagnostic tests so that you fix the problem quickly and efficiently without replacing unnecessary parts and wasting money. It really helps if you have a fuel pressure gauge with a shut off tap in the line.
The first test that you should always carry out when you have a problem with K-Jetronic or KE-Jetronic, is the return volume test. If you have a low return volume every other test you do will give you false information.
1 . Return Volume Test
The fuel pump can give the required pressures but be very low on volume resulting in low power and/or misfires.
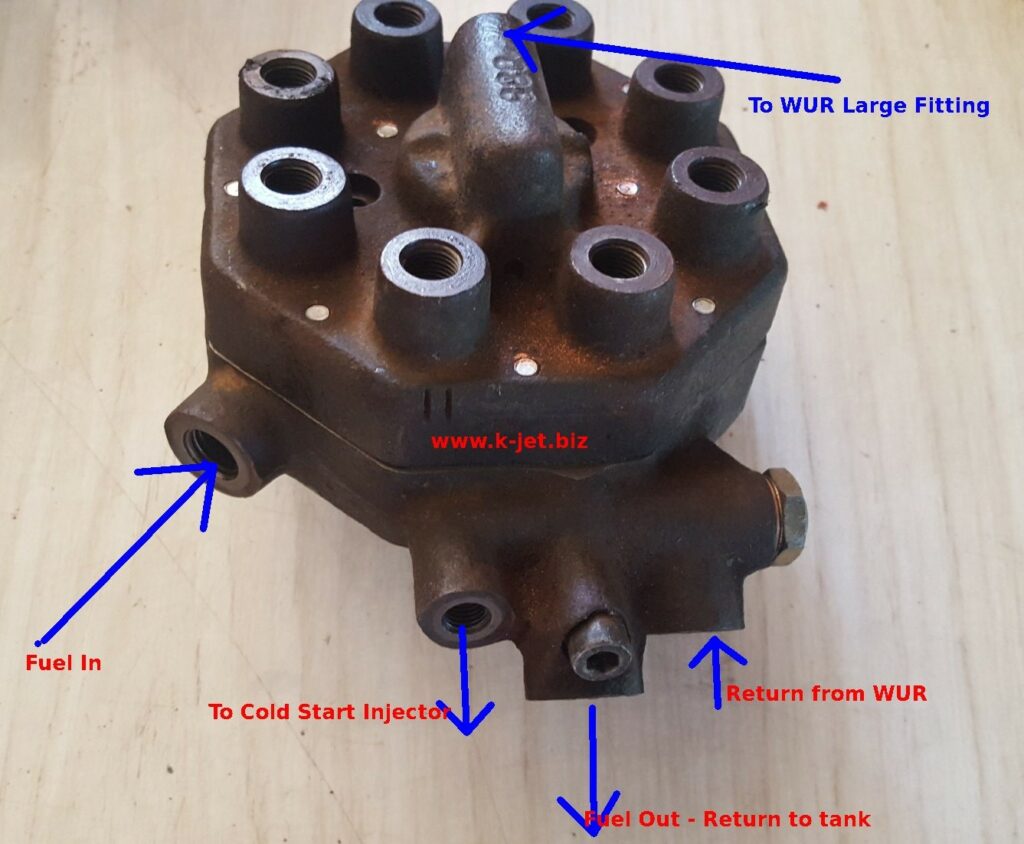
Locate the fuel return line. On fuel distributors, in the lower half there will be 2 larger hoses and up to 4 smaller hoses. The large hose on it’s own is the supply, the other large hose, beside the system pressure valve, is the return hose.
On K-Jet fuel distributors there is usually a flexible hose about 30cm (12”) long from the 17mm fuel distributor fitting beside the pressure regulator, which joins a solid line back to the tank.
On KE-Jet fuel distributors the flexible hose goes from the separate fuel pressure regulator to the solid fuel return line. The fuel Pressure regulator is usually found right beside the fuel distributor with a metal pipe about 75mm (3”) long between them.
With the engine off, disconnect the flexible fuel line from the solid pipe at the joiner. Insert the flexible hose into a measuring container of some sort, eg an old 5L oil container.
Start the engine, or bridge the fuel pump relay and start a timer. The volume of fuel must be at least 1L in 30 seconds. Anything less than that means there is a fault. Usually the fuel pump itself but it could also be a faulty accumulator leaking fuel back to the tank, a blocked fuel filter, a blockage in the pick-up in the tank, a restriction in the fuel pipe, or some cars have a strainer in the fuel inlet fitting of the distributor that may be blocked.
Even check that you are getting 12volts to the fuel pump and that the earth for the fuel pump is good.
But without 1litre in 30 seconds, don’t proceed until you have rectified this fault.
2. Fuel pressures – K-Jet
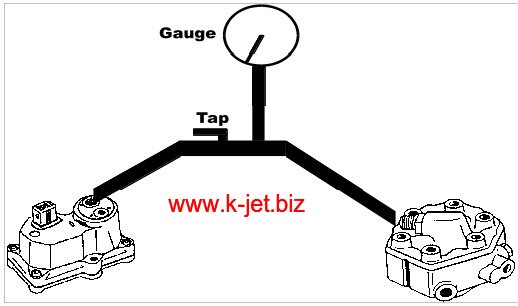
1/ Remove fitting from center of fuel distributor and large fitting on warm-up regulator.
2/ Install gauge with the tap closest to the Warm-up regulator.
3/ With a cold engine or cold warm-up regulator and the gauge tap open, crank engine or start engine and record pressure. This is the “Cold Control Pressure”.
4/ Close tap and record pressure. With the tap closed you will record the “System pressure”.
5/ Open the tap, re-fit the Warm-up Regulator electrical terminal, start the engine and watch/record the changing pressure as the engine warms up.
Typical Control Pressure readings.
Cold engine.
10 degrees C. 1.3 – 1.6 bar,
20 degrees C. 1.6 – 2.0 bar.
30 degrees C. 2.0 – 2.4 bar.
Warm engine. 3.4 – 3.8 bar.
Vacuum type warm-up regulator with vacuum line disconnected and warm engine
2.8 – 3.2 bar.
Typical System Pressure reading. 4.8 – 5.4 bar.
3. Fuel Pressures KE-Jet
Remove the blanking plugs (12mm) from both the centre of the fuel distributor and the bottom half.
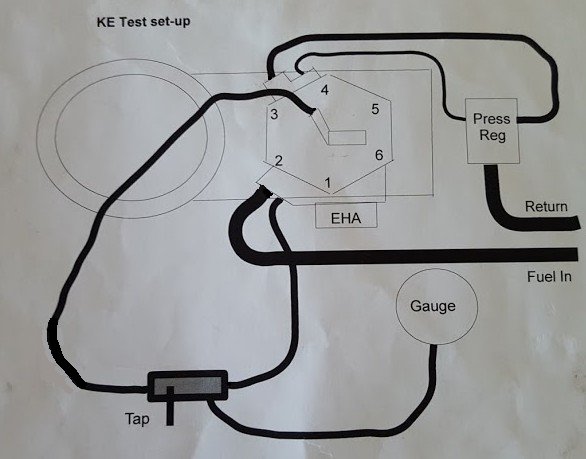
Install the fuel pressure gauge with the tap closest to the top half.
With the tap open you will get a system pressure reading.
Close the tap and you will get the control pressures, the lower chamber pressures. The control pressure varies according to the current going to the EHA (Electro-Hydraulic Actuator) which is the small black box screwed to the side of the Fuel Distributor.
KE-Jetronic system pressure is usually around 5.5-6.0 bar.
Here are some guide line lower chamber pressures you could expect to find:
- at operating temperature – 0.4bar less that system pressure
- at 200c, idle – 0.5bar less that system pressure
On my test bench, these are the typical lower chamber pressures I get when applying current to the EHA. System pressure of 5.5bar
20mA – 5.0bar
40mA – 4.8bar
60mA – 4.6bar
4. Testing current at the EHA
Remove the connector on the EHA.
You need to make a wire connector to go from one terminal on the wiring plug to it’s connector on the EHA.
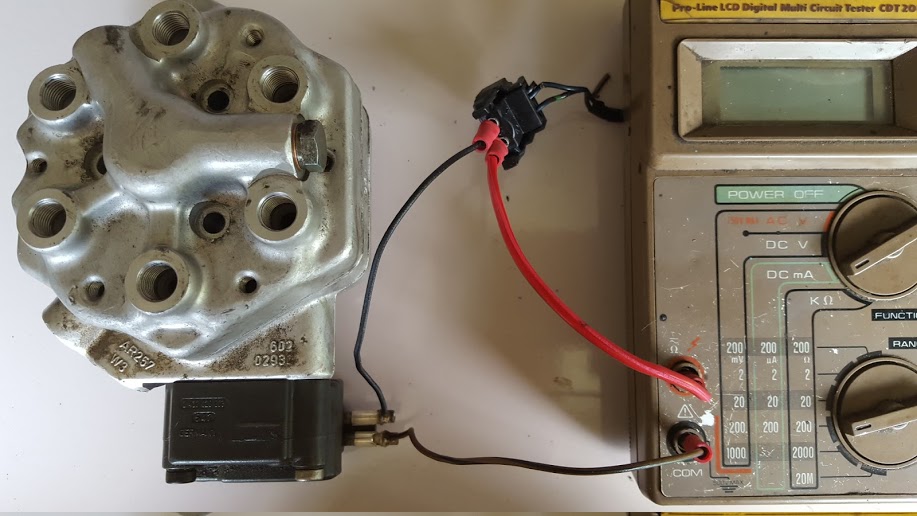
You need a multimeter with mA scale. Your multimeter, switched to milliamps, (200 scale if you have that option). Disconnect the EHA plug and run a wire between the plug and the corresponding terminal on the EHA. The multimeter wires now goes between the wiring plug and the EHA.
Typical current at EHA in milliamps (mA)
Ignition on: -10 to -20mA
Cranking starter motor: -120mA
Idle, warm engine: +/-5mA
Idle, cold engine: -5 to -10mA
Under acceleration: >-20mA